
| 일 | 월 | 화 | 수 | 목 | 금 | 토 |
|---|---|---|---|---|---|---|
| 1 | ||||||
| 2 | 3 | 4 | 5 | 6 | 7 | 8 |
| 9 | 10 | 11 | 12 | 13 | 14 | 15 |
| 16 | 17 | 18 | 19 | 20 | 21 | 22 |
| 23 | 24 | 25 | 26 | 27 | 28 |
- 구글 OAuth login
- 개발자 취업
- Python
- 코딩테스트 준비
- 파이썬
- 전략패턴 #StrategyPattern #디자인패턴
- jwttoken
- @FeignClient
- 프로그래머스 이중우선순위큐
- TiL
- 빈 충돌
- 인프콘 2024
- 항해99
- spring batch 5.0
- 개발자부트캠프추천
- jwt
- DesignPattern
- 취업리부트코스
- JavaScript
- 99클럽
- 디자인 패턴
- KPT회고
- 1주일회고
- 프로그래머스
- 커스텀 헤더
- 단기개발자코스
- 빈 조회 2개 이상
- 디자인패턴
- Spring multimodule
- infcon 2024
- Today
- Total
m1ndy5's coding blog
Google OAuth로그인 구현하기 1 본문
Google Cloud Platform에 들어가서 몇가지 설정해주기
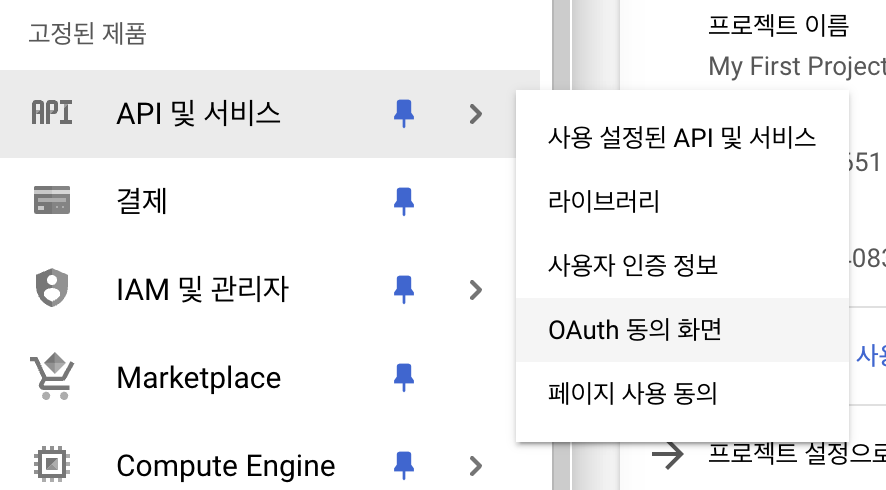
간략한 정보 입력을 먼저 한다.
그 다음으로 OAuth 클라이언트 ID를 발급받는다.
이 때 승인된 리디렉션 URI에는 구글 인가 서버에서 주는 code를 받을 URI을 넣으면된다!
나 같은 경우엔 /login/google/link -> 로그인 성공 및 코드 발급 -> /login/google/token 으로 해주었다.(코드로 AccessToken 받을거라)
이렇게 설정을 해주면 클라이언트 id와 클라이언트 secret을 주게 되고 이걸 사용해서 OAuth 로그인을 구현할 것이다!application.yml 혹은 application.properties에 사용될 정보들 넣어주기
코드를 좀더 깔끔하게 관리하기 위해서 위에서 받았던 clientId, clientSecret와 RedirectUri, TokenUri를 설정해주겠다.
나 같은 경우엔 깃허브에 올라가는 것을 방지하기 위해서 숨겨주었다!Controller 만들기
로그인 요청을 받을 Uri와 Code를 보냈을 때 Token을 받아올 Uri 두가지를 만든다.@RestController @RequiredArgsConstructor @RequestMapping("/login") public class AuthController { private final AuthService authService; @GetMapping("/{oauthProvider}/link") public void generateLink(@PathVariable("oauthProvider") final String oauthProvider){ authService.request(); } @GetMapping("/{oauthProvider}/token") public ResponseEntity<String> generateToken(@PathVariable("oauthProvider") final String oauthProvider, @RequestParam(name = "code") String code){ System.out.println(authService.generateTokenWithCode(code)); return ResponseEntity.ok("토큰 받아오기 성공"); } }oauthProvider를 PathVariable로 받는 이유는 후에 구글 말고 다른 로그인들도 구현했을 때 이을 통해 분기처리할 예정이다.
Service 만들기
이제 컨트롤러에서 넘어온 요청을 처리할 Service를 만들자@RequiredArgsConstructor @Service public class AuthService { private final OAuthEndpoint oAuthEndpoint; private final OAuthClient oAuthClient; private final HttpServletResponse response; public void request() { try { response.sendRedirect(oAuthEndpoint.generate()); } catch (IOException e) { throw new RuntimeException(e); } } public String generateTokenWithCode(final String code){ return oAuthClient.getOAuthMember(code); } }request코드를 살펴보면 /login/google/link로 사용자가 요청을 했을 때 oAuthEndpoint.generate()를 사용해서 구글 인가 서버에게 로그인을 요청하게된다. oAuthEndpoint 또한 다양한 소셜로그인이 들어올 수 있게 OAuthEndpoint를 인터페이스로 만들고 하나씩 구현했다.
@FunctionalInterface
public interface OAuthEndpoint {
 String generate();
}
@Component
public class GoogleOAuthEndpoint implements OAuthEndpoint{
private static final String GOOGLE_OAUTH_END_POINT =
        "https://accounts.google.com/o/oauth2/v2/auth";
private static final List<String> SCOPES =
        List.of("https://www.googleapis.com/auth/userinfo.profile",
                "https://www.googleapis.com/auth/userinfo.email");

private final String googleRedirectUri;
private final String googleClientId;

public GoogleOAuthEndpoint(@Value("${spring.security.oauth2.google.redirect-uri}") String googleRedirectUri,
                           @Value("${spring.security.oauth2.google.client-id}") String googleClientId) {
    this.googleRedirectUri = googleRedirectUri;
    this.googleClientId = googleClientId;
}

@Override
public String generate() {
    return GOOGLE_OAUTH_END_POINT + "?"
            + "client_id=" + googleClientId + "&"
            + "redirect_uri=" + googleRedirectUri + "&"
            + "response_type=code&"
            + "scope=" + String.join(" ", SCOPES);
}
}
@Component를 붙여줘야 빈에 등록이 되서 자동의존성주입이 가능하니 빼먹지 말고 붙이자!!
구글 oauth endpoint는 "https://accounts.google.com/o/oauth2/v2/auth" 이것이고 scope은 이전 구글 클라우드 플랫폼에서 어떤정보들을 가져올 것인지 체크를 했었고 나는 profile, email, openId를 선택해서 일단 저렇게 설정했다.
generate()메서드는 구글 인가서버에게 요청을 보내는 uri를 만드는 메서드이다. 정해진 포맷이니 구글 OAuth 공식 document를 보면 된다.
---
사용자가 구글 로그인을 완료하고 나면 구글에서 로그인이 완료됐다고 코드를 보내주게 되는데
이 때 이 코드는 우리의 redirectUri의 Parameter로 날라오게 된다. ?code=123dfsdfqweq 이렇게!
그 코드를 가지고 AccessToken을 발급받으면 되는데 이 또한 구현할 OAuth 로그인의 종류가 많을 수도 있으니 OAuthClient라는 인터페이스를 만들고 GoogleOAuthClient과 같은 구현체를 만들었다.
@FunctionalInterface
public interface OAuthClient {
String getOAuthMember(final String code);
}
@Component
public class GoogleOAuthClient implements OAuthClient{
private final String googleRedirectUri;
private final String googleClientId;
private final String googleClientSecret;
private final String googleTokenUri;

public GoogleOAuthClient(@Value("${spring.security.oauth2.google.redirect-uri}") String googleRedirectUri,
                         @Value("${spring.security.oauth2.google.client-id}")String googleClientId,
                         @Value("${spring.security.oauth2.google.client-secret}")String googleClientSecret,
                         @Value("${spring.security.oauth2.google.token-uri}")String googleTokenUri) {
    this.googleRedirectUri = googleRedirectUri;
    this.googleClientId = googleClientId;
    this.googleClientSecret = googleClientSecret;
    this.googleTokenUri = googleTokenUri;
}

@Override
public String getOAuthMember(String code) {
    RestTemplate restTemplate = new RestTemplate();

    ResponseEntity<String> responseEntity =
            restTemplate.postForEntity(googleTokenUri, generateRequestParams(code), String.class);
    if (responseEntity.getStatusCode() == HttpStatus.OK){
        return responseEntity.getBody();
    }
    return "구글 로그인 요청 처리 실패";
}

private MultiValueMap<String, String> generateRequestParams(final String code){
    MultiValueMap<String, String> params = new LinkedMultiValueMap<>();
    params.add("client_id", googleClientId);
    params.add("client_secret", googleClientSecret);
    params.add("code", code);
    params.add("grant_type", "authorization_code");
    params.add("redirect_uri", googleRedirectUri);
    return params;
}
}
```
다른 사람의 코드를 참고하면서 하다보니 이름이 살짝 잘못지어지긴했는데(?) 어쨋든 코드를 가지고 토큰을 발급해주는 GoogleTokenUri에 코드를 포함한 여러정보들(ClientId, ClientSecret 등등)을 보내주고 받은 응답의 Body를 까보면
{
"access_token": "",,
"expires_in": ~
"scope": ,"
"token_type": "Bearer",
"id_token": "
}
이런식으로 응답이 온것을 잘 확인할 수 있을 것이다.
이제 이렇게 받은 AccessToken으로 구글 리소스 서버에 사용자 정보를 달라고 요청하면 간단하게 프로필 사진, 이름, 이메일 정도는 받아올 수 있다!
이건 이후에 다시 진행하겠다.
참고 : https://github.com/woowacourse-teams/2022-dallog/pull/53
https://antdev.tistory.com/71
'Toy Projects > 중간 장소 추천 서비스' 카테고리의 다른 글
| 1차 API 설계 및 클래스 설계 (0) | 2023.12.09 |
|---|---|
| 기술 스택 및 1차 구현 기능 정하기 (0) | 2023.12.09 |